【Flutter】スマホの位置情報をバックグラウンドで取得する

目次
こんにちは。スカイアーチHRソリューションズのきむです。
今回はスマホの位置情報をバックグラウンドで取得してサーバへ送信する方法を紹介します。
ソースコードは下記の記事に記載されているものを追加+修正していきます。
環境
今回使用する環境は下記のとおりです。
Flutter:3.19.5
Dart:3.3.3
Android Studio:Iguana | 2023.2.1
Xcode:15.3
パッケージインストール
位置情報をバックグラウンドで取得するために必要なパッケージです。

サーバへ位置情報を送信するためのHTTPクライアントはdioを使用します。
flutter pub add background_locator_2 dioクラスの作成
background_locator_2を使用してバックグラウンド位置情報を取得するクラスをutilsフォルダ直下に作成します。
import 'dart:isolate';
import 'dart:ui';

import 'package:background_locator_2/background_locator.dart';
import 'package:background_locator_2/location_dto.dart';
import 'package:background_locator_2/settings/android_settings.dart';
import 'package:background_locator_2/settings/ios_settings.dart';
import 'package:background_locator_2/settings/locator_settings.dart';
import 'package:dio/dio.dart';

final dio = Dio(
  BaseOptions(
    baseUrl: 'API URL', // 使用するAPIのURLを記述してください
    contentType: 'application/json',
  ),
);

Future<void> initPlatformState() async {
  await BackgroundLocator.initialize();
}

class LocationCallbackHandler {
  static const String isolateName = "LocatorIsolate";

  @pragma('vm:entry-point')
  static Future<void> _initCallback(Map<dynamic, dynamic> params) async {
    print('initCallback');
  }

  @pragma('vm:entry-point')
  static Future<void> _disposeCallback() async {
    print('disposeCallback');
  }

  @pragma('vm:entry-point')
  static Future<void> _callback(LocationDto locationDto) async {
    final SendPort? send = IsolateNameServer.lookupPortByName(isolateName);
    send?.send(locationDto.toJson());

    await dio.post('/location', data: {
      'latitude': locationDto.latitude,
      'longitude': locationDto.longitude
    });
  }

  static void startLocationService() {
    BackgroundLocator.registerLocationUpdate(_callback,
        initCallback: _initCallback,
        disposeCallback: _disposeCallback,
        autoStop: false,
        iosSettings: const IOSSettings(
            accuracy: LocationAccuracy.NAVIGATION, distanceFilter: 0),
        androidSettings: const AndroidSettings(
          accuracy: LocationAccuracy.NAVIGATION,
          interval: 5,
          distanceFilter: 0,
        ));
  }
}
作成したクラスはBarrel Fileでエクスポートするためにutils.dartにexport文を記述します。
export 'get_location.dart';
export 'location_permission_request.dart';
export 'get_background_location.dart'; // 追記
home.dartの修正
前回の記事で作成したhome.dartを修正します。
変更ポイントは下記の通りです。
- initState()の追加。background_locator_2に必要な初期化処理を実行。
- getボタンをstartボタンへ変更。ボタン押下時のアクションをバックグラウンド処理の開始に変更。
- cancelボタン押下時のアクションをバックグラウンド処理の停止へ変更。
- その他不要な記述を削除
import 'dart:isolate';
import 'dart:ui';

import 'package:background_locator_2/background_locator.dart';
import 'package:background_locator_2/location_dto.dart';
import 'package:flutter/material.dart';
import 'package:location/location.dart';
import 'package:sample_location_app/import.dart';

class HomeView extends StatefulWidget {
  const HomeView({super.key, required this.title});

  final String title;

  @override
  State<HomeView> createState() => _HomeViewState();
}

class _HomeViewState extends State<HomeView> {
  LocationDto? _currentLocation;
  final location = Location();
  static const String isolateName = "LocatorIsolate";
  ReceivePort port = ReceivePort();

  // initStateの追加
  @override
  void initState() {
    super.initState();
    IsolateNameServer.registerPortWithName(port.sendPort, isolateName);
    port.listen((dynamic data) {
      print('LocationData: $data');
      LocationDto? locationDto =
          (data != null) ? LocationDto.fromJson(data) : null;

      setState(() => _currentLocation = locationDto);
    });

    initPlatformState();
  }

  void _requestLocationPermission() async {
    await RequestLocationPermission.request(location);
  }

  @override
  Widget build(BuildContext context) {
    return Scaffold(
      appBar: AppBar(
        backgroundColor: Theme.of(context).colorScheme.inversePrimary,
        title: Text(widget.title),
        centerTitle: true,
      ),
      body: Center(
        child: Column(
          mainAxisAlignment: MainAxisAlignment.center,
          children: <Widget>[
            Padding(
              padding: const EdgeInsets.all(10),
              child: Text(
                'Lat:${_currentLocation?.latitude}\nLng:${_currentLocation?.longitude}',
                style: Theme.of(context).textTheme.bodyLarge,
              ),
            ),
            ButtonBar(
              alignment: MainAxisAlignment.center,
              buttonPadding: const EdgeInsets.all(10),
              children: [
                SizedBox(
                  height: 50,
                  width: 105,
                  child: ElevatedButton(
                    onPressed: _requestLocationPermission,
                    child: const Text('request'),
                  ),
                ),
                // getボタンをstartボタンへ変更
                SizedBox(
                  height: 50,
                  width: 105,
                  child: ElevatedButton(
                    onPressed: () {
                      LocationCallbackHandler
                          .startLocationService(); // バックグラウンド処理の開始
                    },
                    child: const Text('start'),
                  ),
                ),
                SizedBox(
                  height: 50,
                  width: 105,
                  child: ElevatedButton(
                    onPressed: () {
                      BackgroundLocator
                          .unRegisterLocationUpdate(); // キャンセル処理をバックグラウンド処理の停止へ変更
                    },
                    child: const Text('cancel'),
                  ),
                ),
              ],
            ),
          ],
        ),
      ),
    );
  }
}
OS設定ファイルの修正
background_locator_2に必要な設定を行なっていきます。
Android
AndroidManifest.xmlの修正
ファイルは~/android/app/src/main/に配置されています。
<manifest xmlns:android="http://schemas.android.com/apk/res/android">
    <uses-permission android:name="android.permission.FOREGROUND_SERVICE" />
    <uses-permission android:name="android.permission.ACCESS_BACKGROUND_LOCATION" />
    <!-- 追加 -->
    <uses-permission android:name="android.permission.ACCESS_FINE_LOCATION" />
    <uses-permission android:name="android.permission.WAKE_LOCK" />
    <!-- ここまで -->

    <application android:label="sample_location_app" android:name="${applicationName}"
        android:icon="@mipmap/ic_launcher">
        <activity android:name=".MainActivity" android:exported="true"
            android:launchMode="singleTop" android:theme="@style/LaunchTheme"
            android:configChanges="orientation|keyboardHidden|keyboard|screenSize|smallestScreenSize|locale|layoutDirection|fontScale|screenLayout|density|uiMode"
            android:hardwareAccelerated="true" android:windowSoftInputMode="adjustResize">
            <meta-data android:name="io.flutter.embedding.android.NormalTheme"
                android:resource="@style/NormalTheme" />
            <intent-filter>
                <action android:name="android.intent.action.MAIN" />
                <category android:name="android.intent.category.LAUNCHER" />
            </intent-filter>
        </activity>

        <!-- 追加 -->
        <service android:name="yukams.app.background_locator_2.IsolateHolderService"
            android:permission="android.permission.FOREGROUND_SERVICE"
            android:exported="true"
            android:foregroundServiceType="location" />
        <!-- ここまで -->

        <meta-data android:name="flutterEmbedding" android:value="2" />
    </application>

    <queries>
        <intent>
            <action android:name="android.intent.action.PROCESS_TEXT" />
            <data android:mimeType="text/plain" />
        </intent>
    </queries>
</manifest>
Androidの設定は以上です。
iOS
AppDelegateの修正
ファイルは~/ios/Runner/に配置されています。
import UIKit
import Flutter
import background_locator_2 // 追加

// 追加
func registerPlugins(registry: FlutterPluginRegistry) -> () {
    if (!registry.hasPlugin("BackgroundLocatorPlugin")) {
        GeneratedPluginRegistrant.register(with: registry)
    }
}

@UIApplicationMain
@objc class AppDelegate: FlutterAppDelegate {
  override func application(
    _ application: UIApplication,
    didFinishLaunchingWithOptions launchOptions: [UIApplication.LaunchOptionsKey: Any]?
  ) -> Bool {
    GeneratedPluginRegistrant.register(with: self)
    BackgroundLocatorPlugin.setPluginRegistrantCallback(registerPlugins) // 追加
    return super.application(application, didFinishLaunchingWithOptions: launchOptions)
  }
}
続いてXcodeからBackground ModesのLocation Updatesを有効にします。
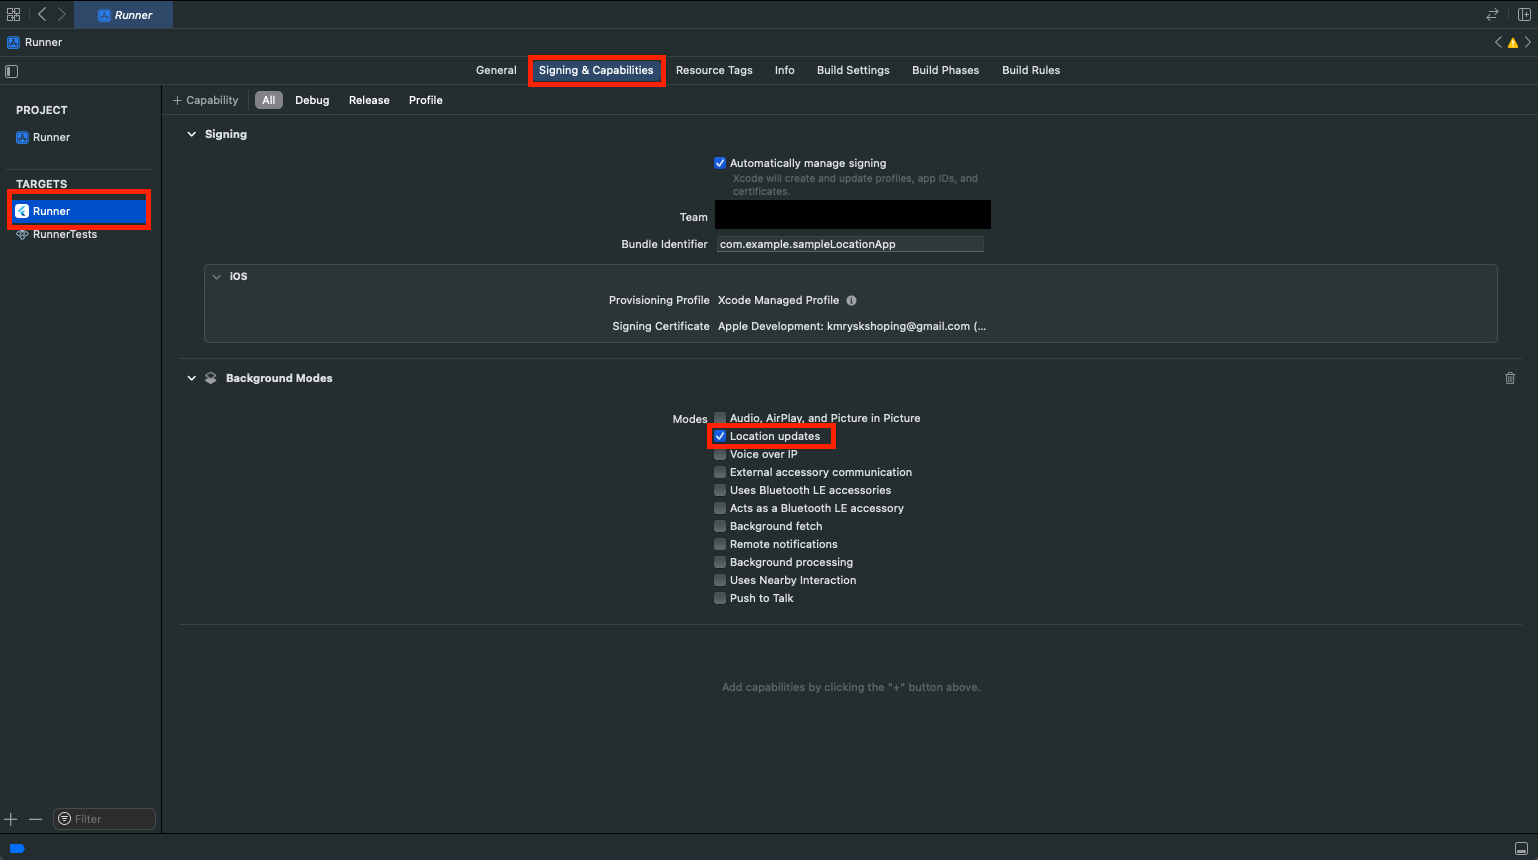
iOSの設定は以上です。
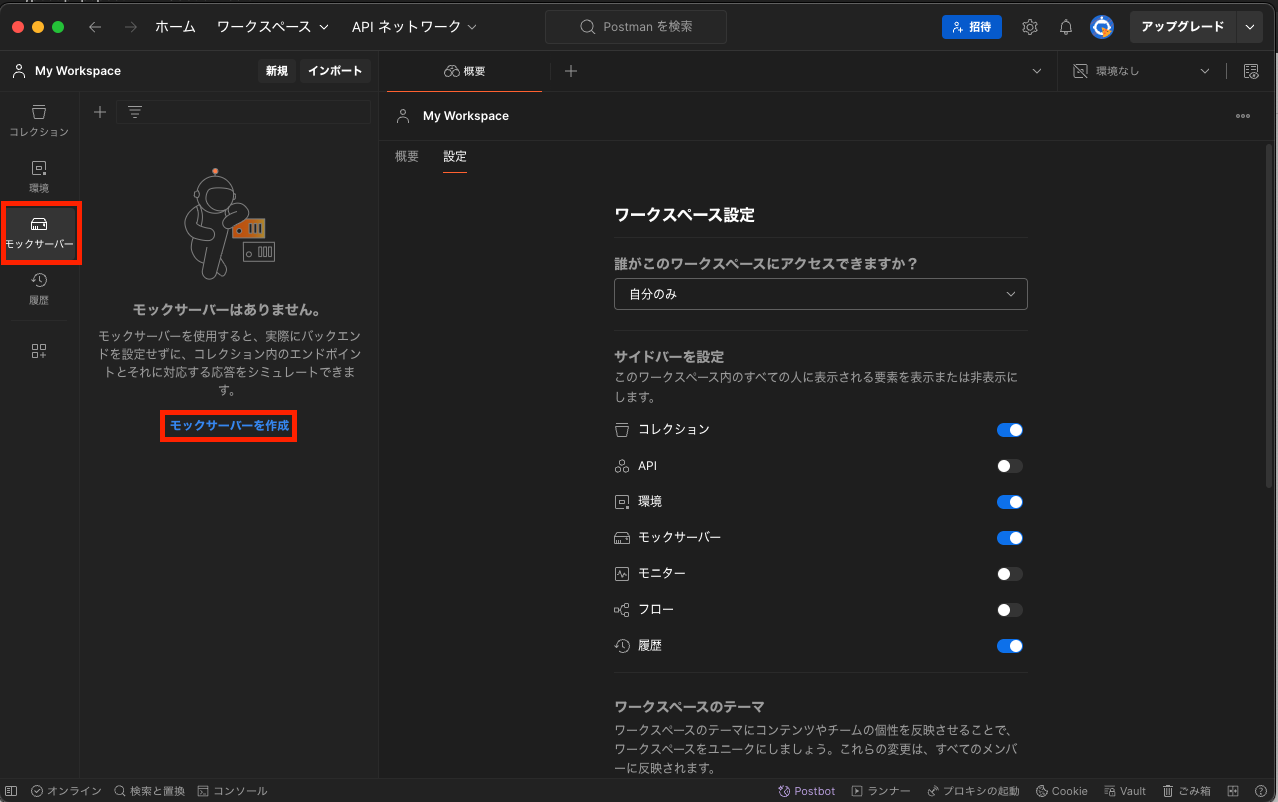
モックサーバの用意
位置情報を送信するためのモックサーバを用意します。
PostmanのMockServer機能を使用することで簡単にMockサーバが作成できます。
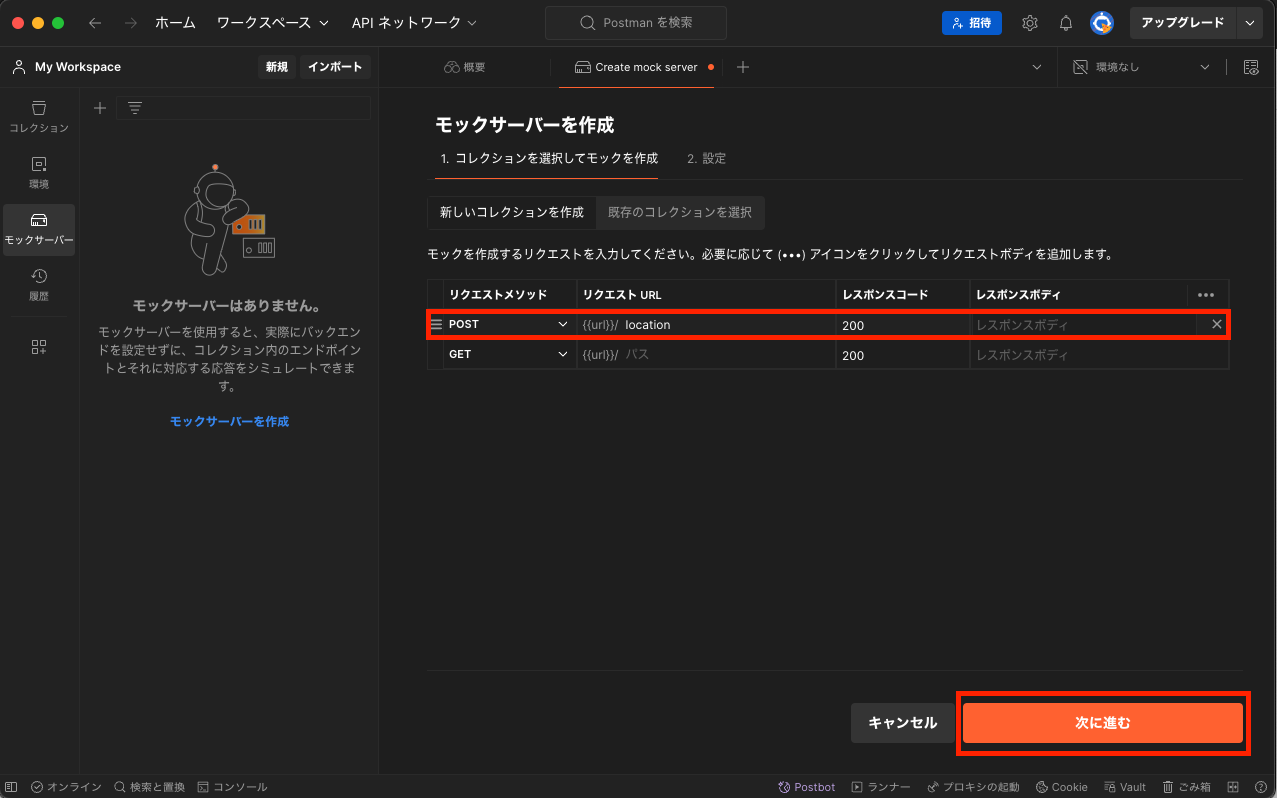
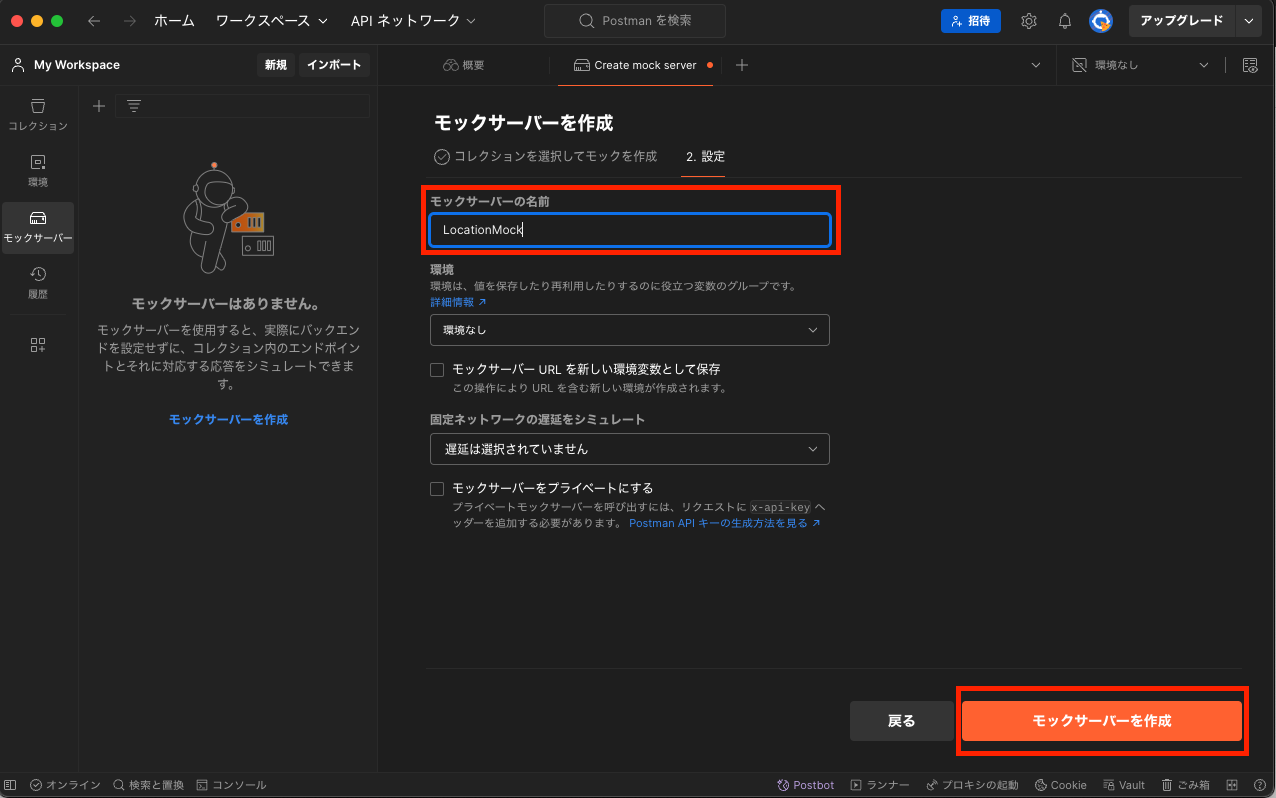
Mockサーバ名やリクエストURLのパス、レスポンスボディは自由に設定して問題ありません。
get_background_location.dartで/locationに対してPOSTを行う記述としているので本記事ではリクエストパスを/locationとしています。
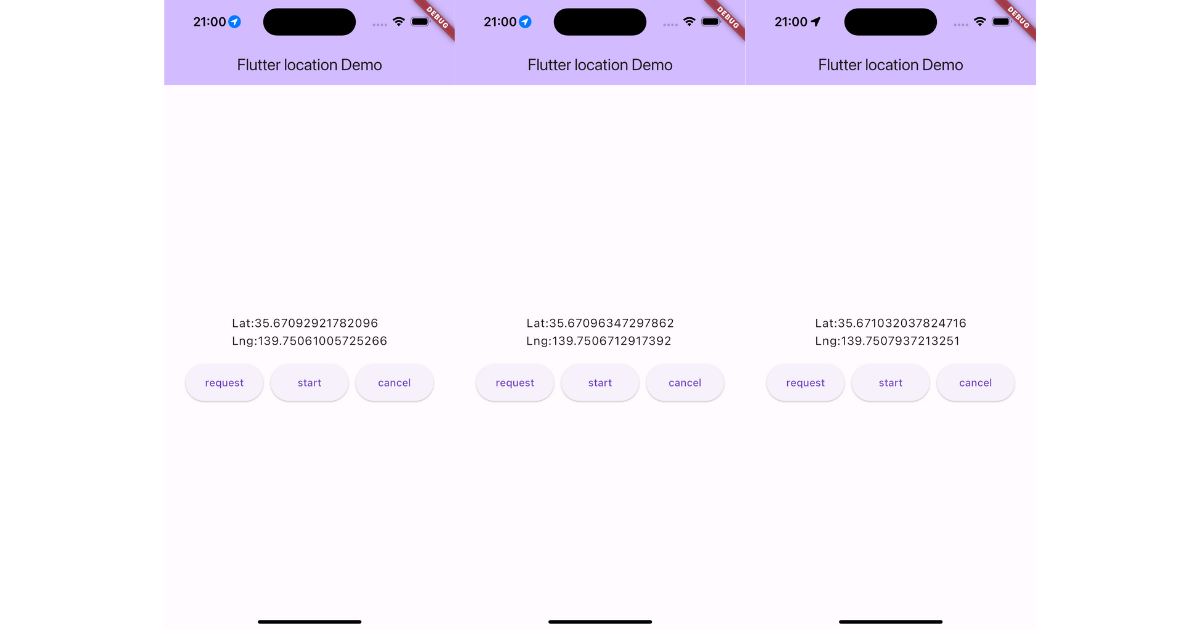
動作確認
startボタンを押して実際に処理を動かしてみましょう。
flutter: initCallback
flutter: LocationData: {latitude: 35.670860761683024, longitude: 139.7504875492024, accuracy: 5.0, altitude: 0.0, speed: -1.0, speed_accuracy: 0.0, heading: -1.0, time: 1716724818695.145, is_mocked: false, provider: }
flutter: LocationData: {latitude: 35.67089498074582, longitude: 139.7505488097199, accuracy: 5.0, altitude: 0.0, speed: -1.0, speed_accuracy: 0.0, heading: -1.0, time: 1716724819698.042, is_mocked: false, provider: }
flutter: LocationData: {latitude: 35.67092921782096, longitude: 139.75061005725266, accuracy: 5.0, altitude: 0.0, speed: -1.0, speed_accuracy: 0.0, heading: -1.0, time: 1716724820699.387, is_mocked: false, provider: }
flutter: LocationData: {latitude: 35.67096347297862, longitude: 139.7506712917392, accuracy: 5.0, altitude: 0.0, speed: -1.0, speed_accuracy: 0.0, heading: -1.0, time: 1716724821695.473, is_mocked: false, provider: }
flutter: LocationData: {latitude: 35.670997746289466, longitude: 139.75073251311753, accuracy: 5.0, altitude: 0.0, speed: -1.0, speed_accuracy: 0.0, heading: -1.0, time: 1716724822696.914, is_mocked: false, provider: }
flutter: LocationData: {latitude: 35.671032037824716, longitude: 139.7507937213251, accuracy: 5.0, altitude: 0.0, speed: -1.0, speed_accuracy: 0.0, heading: -1.0, time: 1716724823698.3718, is_mocked: false, provider: }
位置情報が更新されるたびに画面が再描画され、ログからも一定間隔で位置情報が取得できていることがわかります。
サーバ側のログも見てみましょう。
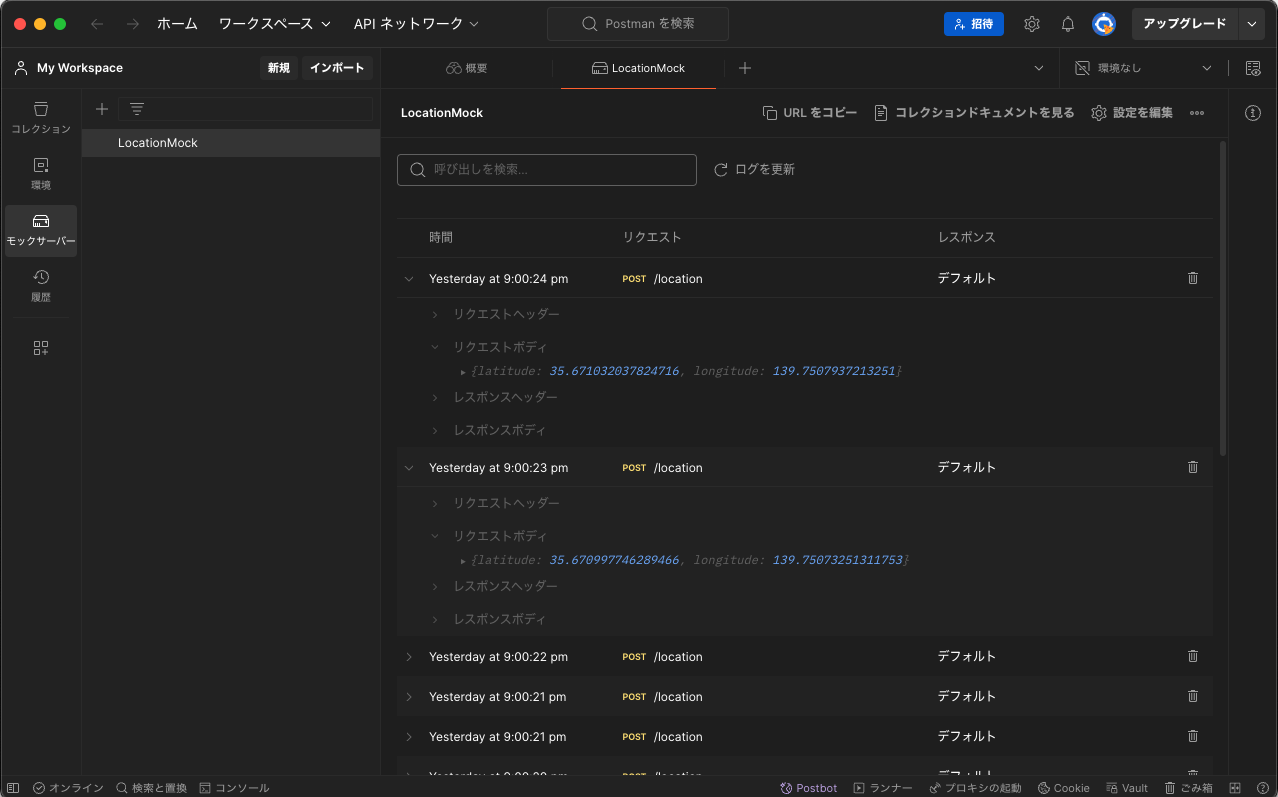
サーバ側にもちゃんとリクエストが届いてますね。
アプリをバックグラウンド状態にしても位置情報を取得してサーバへ送信し続けるので試してみて下さい。
おわりに
background_locator_2を使用すればバックグラウンドでの位置情報取得と取得したデータの処理なども簡単に行えますので、ぜひ活用してみてください。
私の記事が少しでも皆様のご参考になれば幸いです!

関連記事
-
 【Flutter】スマホの位置情報を取得してみよう