【Slack】Slack次世代プラットフォームでAWS SDKを使ってみる
目次
こんにちは、CloudBuildersのきむです。
今回はタイトル通りSlack次世代プラットフォームを使ってAWS SDKを使用する方法をご紹介します。
Slack次世代プラットフォームってなんだろう?
まずはSlack次世代プラットフォーム(以下次世代プラットフォーム)の簡単なご紹介です。
次世代プラットフォームとはSlackで使用できるワークフローを作成する仕組みです。
ワークフローを作成する仕組みとしてSlackワークフロービルダーが存在しますが、次世代プラットフォームを使用することでSlackワークフロービルダーより高度でカスタマイズ可能なワークフローの作成が可能になります。
次世代プラットフォームの開発環境に関する情報は下記のとおりです。
| ランタイム | Deno |
| 開発言語 | TypeScript |
| アプリの実行・管理 | Slack CLI |
その他の詳しいことは公式ドキュメントに記載がありますのでぜひ参照してみてください。
※次世代プラットフォームはSlackのフリープランでは動作しないのでご注意ください。
Slack CLIのセットアップ
次世代プラットフォームではSlack CLIを使ってアプリの実行と管理を行います。
公式ドキュメントのQuickstartを参考にセットアップを実施します。筆者の環境はMacOSなので本記事にはMacOSでのインストール手順を実行していきます。
$ curl -fsSL https://downloads.slack-edge.com/slack-cli/install.sh | bashインストールが完了したらslackコマンドが動作することを確認します。
$ slack --version
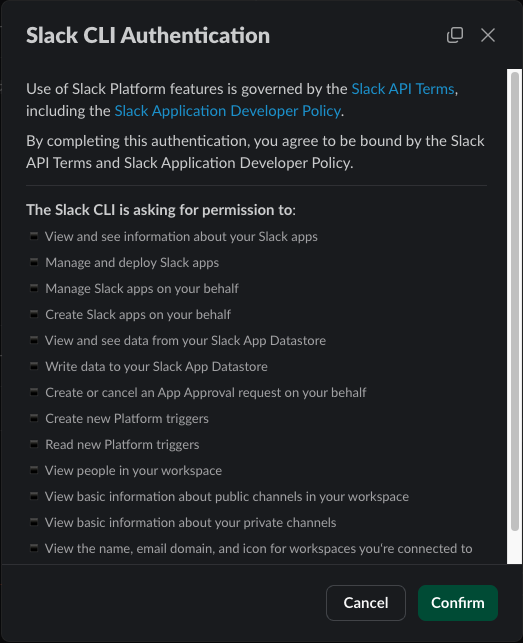
Using slack v2.26.0コマンドの動作が確認できたらSlackワークスペースでSlack CLIを承認します。
$ slack login
📋 Run the following slash command in any Slack channel or DM
This will open a modal with user permissions for you to approve
Once approved, a challenge code will be generated in Slack
/slackauthticket ABC123defABC123defABC123defABC123defXYZ
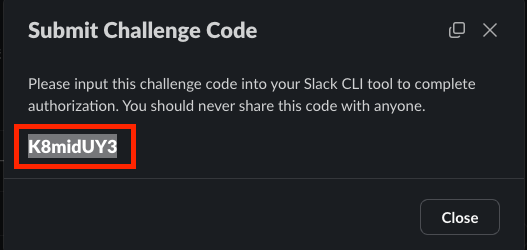
? Enter challenge code /slackauthticket ~の部分を連携させたいワークスペース内の任意の会話に貼り付けて送信すると下記のような画面が表示されるのでConfirmを選択しましょう。
表示されたコードを実行中のプロンプトに貼り付けると連携完了です。
$ slack login

📋 Run the following slash command in any Slack channel or DM
   This will open a modal with user permissions for you to approve
   Once approved, a challenge code will be generated in Slack

/slackauthticket ABC123defABC123defABC123defABC123defXYZ

? Enter challenge code K8midUY3

🔑 You've successfully authenticated!
   Authorization data was saved to ~/.slack/credentials.json

💡 Get started by creating a new app with slack create my-app
   Explore the details of available commands with slack help
アプリの作成
Slack CLIでアプリを作成していきます。
$ slack create my-app

? Select a template to build from: [Use arrows to move]

  Issue submission (default sample)
  Basic app that demonstrates an issue submission workflow

❱ Scaffolded template
  Solid foundation that includes a Slack datastore

  Blank template
  A, well.. blank project

  View more samples

  Guided tutorials can be found at api.slack.com/automation/samples

? Select a template to build from: Scaffolded template

⚙️  Creating a new Slack project
   Cloning template slack-samples/deno-starter-template
   To path ~/slack/my-app

✨ my-app successfully created
   Files for the project now exist
   Detected a Deno project in preparations for automation

📦 Installed project dependencies
   Cache the latest with deno cache import_map.json

🧭 Explore the documentation to learn more
   Read the README.md or peruse the docs over at api.slack.com/automation
   Find available commands and usage info with slack help

📋 Follow the steps below to begin development
   Change into your project directory with cd my-app/
   Develop locally and see changes in real-time with slack run
   When you're ready to deploy for production use slack deploy
利用用途に応じたテンプレートがいくつか存在しますが、今回はScaffolded templateで作成します。
slack createによって作成されるファイル群は下記のとおりです。
my-app
├── LICENSE
├── README.md
├── assets
│   └── default_new_app_icon.png
├── datastores
│   └── sample_datastore.ts
├── deno.jsonc
├── functions
│   ├── sample_function.ts
│   └── sample_function_test.ts
├── import_map.json
├── manifest.ts
├── slack.json
├── triggers
│   └── sample_trigger.ts
└── workflows
    └── sample_workflow.ts
作成が完了したらアプリディレクトリに移動しましょう。
$ cd my-appAWS SDKを使ってみる
それでは実際にAWS SDKを使用するアプリを作成していきます。
今回はSlackワークフローでReadOnlyAccess権限を持ったIAMユーザを作成してアクセスキーとシークレットアクセスキーを発行し、発行された認証情報をSlackで通知します。
aws-sdkを実行するために必要な認証情報は事前に準備して.envファイルに設定しましょう。
$ touch .envREGION=ap-northeast-1
ACCESS_KEY_ID=xxxxxxxxxxxx
SECRET_ACCESS_KEY=xxxxxxxxxxxxまずはaws-sdkのimportをします。今回はnpmパッケージを配布しているCDNからパッケージをimportします。
deps.tsを作成してimportの記述を行います。
$ touch deps.tsexport * as Iam from 'https://esm.sh/@aws-sdk/client-iam@3.609.0'それではaws-sdkを実行するワークフローを作成していきます。
今回作成するワークフローは下記のようなイメージになります。
下記のファイルを編集していきます。
- workflows/sample_workflow.ts
- functions/sample_function.ts
- manifest.ts
import { DefineWorkflow, Schema } from "deno-slack-sdk/mod.ts";
import { SampleFunctionDefinition } from "../functions/sample_function.ts";
const SampleWorkflow = DefineWorkflow({
callback_id: "sample_workflow",
title: "Sample workflow",
description: "A sample workflow",
input_parameters: {
properties: {
interactivity: {
type: Schema.slack.types.interactivity,
},
channel: {
type: Schema.slack.types.channel_id,
},
user: {
type: Schema.slack.types.user_id,
},
},
required: ["interactivity", "channel", "user"],
},
});
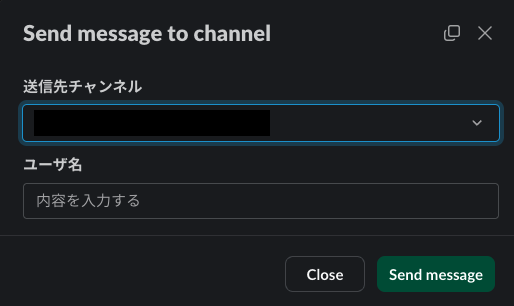
const inputForm = SampleWorkflow.addStep(
Schema.slack.functions.OpenForm,
{
title: "Send message to channel",
interactivity: SampleWorkflow.inputs.interactivity,
submit_label: "Send message",
fields: {
elements: [{
name: "channel",
title: "送信先チャンネル",
type: Schema.slack.types.channel_id,
default: SampleWorkflow.inputs.channel,
}, {
name: "userName",
title: "ユーザ名",
type: Schema.types.string,
}],
required: ["channel", "userName"],
},
},
);
const sampleFunctionStep = SampleWorkflow.addStep(SampleFunctionDefinition, {
userName: inputForm.outputs.fields.userName,
user: SampleWorkflow.inputs.user,
});
SampleWorkflow.addStep(Schema.slack.functions.SendMessage, {
channel_id: inputForm.outputs.fields.channel,
message: sampleFunctionStep.outputs.updatedMsg,
});
export default SampleWorkflow;ワークフローの入力項目を増やしたい場合は、inputFormのfields.elements[]に項目を追加しましょう。
import { DefineFunction, Schema, SlackFunction } from "deno-slack-sdk/mod.ts";
import { Iam } from "../deps.ts";

export const SampleFunctionDefinition = DefineFunction({
  callback_id: "sample_function",
  title: "Sample function",
  description: "A sample function",
  source_file: "functions/sample_function.ts",
  input_parameters: {
    properties: {
      userName: {
        type: Schema.types.string,
      },
      user: {
        type: Schema.slack.types.user_id,
      },
    },
    required: ["userName", "user"],
  },
  output_parameters: {
    properties: {
      updatedMsg: {
        type: Schema.types.string,
      },
    },
    required: ["updatedMsg"],
  },
});

export default SlackFunction(
  SampleFunctionDefinition,
  async ({ inputs, env }) => {
    const config = {
      region: env["REGION"],
      credentials: {
        accessKeyId: env["ACCESS_KEY_ID"],
        secretAccessKey: env["SECRET_ACCESS_KEY"],
      },
    };

    const client = new Iam.IAMClient(config);

    const { userName, user } = inputs;

    await createUser(userName, client);
    await attachPolicy(userName, client);
    const { accessKeyId, secretAccessKeyId } = await createAccessKey(
      userName,
      client,
    );

    const updatedMsg = `:wave:<@${user}> \n
    AccessKeyId: ${accessKeyId}\n
    SecretAccessKeyId: ${secretAccessKeyId}`;

    return { outputs: { updatedMsg } };
  },
);

const createUser = async (
  userName: string,
  client: Iam.IAMClient,
): Promise<void> => {
  const input = {
    UserName: userName,
  };
  const command = new Iam.CreateUserCommand(input);
  await client.send(command);
};

const attachPolicy = async (
  userName: string,
  client: Iam.IAMClient,
): Promise<void> => {
  const input = {
    UserName: userName,
    PolicyArn: "arn:aws:iam::aws:policy/ReadOnlyAccess",
  };
  const command = new Iam.AttachUserPolicyCommand(input);
  await client.send(command);
};

const createAccessKey = async (
  userName: string,
  client: Iam.IAMClient,
): Promise<
  { accessKeyId: string | undefined; secretAccessKeyId: string | undefined }
> => {
  const input = {
    UserName: userName,
  };
  const command = new Iam.CreateAccessKeyCommand(input);
  const response = await client.send(command);
  return {
    accessKeyId: response.AccessKey?.AccessKeyId,
    secretAccessKeyId: response.AccessKey?.SecretAccessKey,
  };
};
SlackFunction内では設定した環境変数をenv[“環境変数名”]で参照可能です。SlackFunction外では参照の仕方が異なるので詳細はこちらを参照してみてください。
import { Manifest } from "deno-slack-sdk/mod.ts";
import SampleWorkflow from "./workflows/sample_workflow.ts";
import SampleObjectDatastore from "./datastores/sample_datastore.ts";

export default Manifest({
  name: "my-app",
  description: "A template for building Slack apps with Deno",
  icon: "assets/default_new_app_icon.png",
  workflows: [SampleWorkflow],
  outgoingDomains: ["iam.amazonaws.com"],
  datastores: [SampleObjectDatastore],
  botScopes: [
    "commands",
    "chat:write",
    "chat:write.public",
    "datastore:read",
    "datastore:write",
  ],
});
今回のようにIAMクライアントを実行する場合は、outgoingDomainでiam.amazonaws.comを許可する必要があります。実行するクライアントによって対象ドメインも異なるのでご注意ください。
Slack CLIのオーバライド
ここまででアプリの実行準備はできました。
あとはslack runやslack buildでアプリの実行・ビルドを行えば良いのですが、デフォルトの挙動では権限が足りず実行に失敗します。
なのでslack.jsonを編集してこれらのコマンドの挙動をオーバーライドをする必要があります。
オーバーライドの詳細についてはこちらを参照してみてください。
{
  "hooks": {
    "get-hooks": "deno run -q --allow-read --allow-net https://deno.land/x/deno_slack_hooks@1.3.0/mod.ts",
    "start": "deno run -q --config=deno.jsonc --allow-read --allow-net --allow-run --allow-env --allow-sys https://deno.land/x/deno_slack_runtime@0.1.1/local-run.ts",
    "build": "deno run -q --config=deno.jsonc --allow-read --allow-write --allow-net --allow-run --allow-env --allow-sys https://deno.land/x/deno_slack_hooks@1.3.0/build.ts"
  }
}
ローカル実行
これで準備が整ったのでまずはローカルでアプリを実行してみましょう。
$ slack run
? Choose a local environment
? Install to a new team YourTeamId

🔔 If you leave this team, you can no longer manage the installed apps
   Installed apps will belong to the team if you leave the workspace

Updating local app install for "YourTeamName"

⚡ Listing triggers installed to the app...
   There are no triggers installed for the app

⚡ Create a trigger
   Searching for trigger definition files under 'triggers/*'...
   Found 1 trigger definition file

? Choose a trigger definition file: triggers/sample_trigger.ts

⚡ Trigger successfully created!

   Sample trigger (local) 1234567890ab (shortcut)
   Created: 2024-07-03 11:51:26 +09:00 (1 second ago)
   Collaborators:
     YourName
   Can be found and used by:
     everyone in the workspace
   https://slack.com/shortcuts/Ft07B6BNQ8NM/6ca46a8c90dc6ca86f17c50df5cb90df

✨ YourName of YourWorkSpaceName
Connected, awaiting events
初回実行時にはインストール先のワークスペースなどが問われますので、アプリを導入したいワークスペースを選択してください。
発行されたURLを任意のDMに貼り付けて送信するか、ショートカットからワークフローを起動できます。

ワークフローを実行するとIAMユーザが作成され、認証情報が通知されます。

アプリのデプロイ
ローカル実行での動作が確認できたら実際にアプリをデプロイしてみましょう。
$ slack deploy
? Choose a deployed environment Install to a new team
? Install to a new team YourTeamId

🔔 If you leave this team, you can no longer manage the installed apps
   Installed apps will belong to the team if you leave the workspace

📚 App Manifest
   Creating app manifest for "my-app" in "YourWorkSpaceName"

🏠 App Install
   Installing "my-app" app to "YourWorkSpaceName"
   Updated app icon: assets/default_new_app_icon.png
   Finished in 5.2s

⚡ Listing triggers installed to the app...
   There are no triggers installed for the app

⚡ Create a trigger
   Searching for trigger definition files under 'triggers/*'...
   Found 1 trigger definition file

? Choose a trigger definition file: triggers/sample_trigger.ts

⚡ Trigger successfully created!

   Sample trigger 1234567890ab (shortcut)
   Created: 2024-07-03 11:58:15 +09:00 (1 second ago)
   Collaborators:
     YourName
   Can be found and used by:
     everyone in the workspace
   https://slack.com/shortcuts/Ft07AD5LFD0X/f3a88a700e06170353c0f05424a3fd9c


🎁 App packaged and ready to deploy
   0.099MB was packaged in 2.3s

🚀 my-app deployed in 13.7s
   App Owner:  YourName
   Workspace:  YourTeamId
   Dashboard:  https://slack.com/apps/AppID

🌩  Visit Slack to try out your live app!
   When you make any changes, update your app by re-running slack deploy

💌 We would love to know how things are going
   Survey your development experience with slack feedback --name platform-improvements
ローカル実行時と同じくインストール先のワークスペースなどが問われるので導入先のワークスペースを選択してください。
ローカル実行時では環境変数を.envファイルから環境変数を参照していましたが、デプロイ後はslack add env “環境変数名” “値”で参照する環境変数を追加する必要があります。
$ slack env add REGION ap-northeast-1
$ slack env add ACCESS_KEY_ID xxxxxxxxxxxx
$ slack env add SECRET_ACCESS_KEY xxxxxxxxxxxx
環境変数追加時も追加するワークスペースを問われるので追加先のワークスペースを選択してください。
ローカル実行時と同じくデプロイ時に発行されるURL、もしくはショートカットからワークフローを起動できます。

さいごに
次世代プラットフォームでaws-sdkを使用する方法を紹介させていただきました。
次世代プラットフォームを使用すれば高機能なワークフローを作成できるのでぜひ活用してみてください。

関連記事
-
 AWS Security HubとBedrock AIで実現するセキュリティ通知システム
 -
 【AWS CDK】LambdaをTypeScriptで書きたい
 -
 【Terraform】TerraformでもLambdaはTypeScriptで書きたい